How Things Work - Chapter 11 Demonstrations
Section 11.1 Household Magnets
Demonstration 11.1.1: The Forces Between Magnets
Description: A bar magnet on a horizontal pivot always turns so that its north pole faces the south pole of a magnet you're holding in your hand, or vice versa.
Purpose: To show that magnets have two different poles and that like poles repel while opposite poles attract.
Supplies:
2 bar magnets
1 horizontal swivel mount for one of the bar magnets
Procedure: Suspend one of the bar magnets on the horizontal mount. Hold the second magnet in your hand and show that its poles repel like poles of the horizontally supported magnet and that its poles attract opposite poles of that magnet.
Explanation: As with electric charges, magnetic poles come in two types: north and south. But unlike electric charges, its impossible to find an isolated north pole or an isolated south pole. Each bar magnet has a north and a south pole. Like poles on two bar magnets experience repulsive forces and opposite poles on two bar magnets experience attractive forces.
Demonstration 11.1.2: Magnets and Metals
Description: A strong magnet is held up to various metals and it sticks to some but not others.
Purpose: To show that some metals have magnetic domains in them and polarize when exposed to strong magnetic poles.
Supplies:
1 strong magnet
several pieces of metal, including steel or iron and copper, brass, or aluminum
several paper clips
Procedure: Hold the magnet against the various pieces of metal and show that it sticks to some but not others. Discuss that the magnet is magnetically polarizing the metals to which it sticks and that it then sticks to the resulting poles. Show that the polarized metals (namely the paper clips) are themselves capable of polarizing and sticking to other metals (namely more paper clips). Show that the magnetic polarization is typically lost when the magnet is removed, but that it's not lost completely in most cases.
Explanation: The magnet polarizes on the materials that are ferromagnetic (or ferrimagnetic). Those materials typically lose their magnetic polarization when the magnet is removed, but the difficulties in demagnetizing the domains often leaves some stuck and the material retains a net magnetization.
Demonstration 11.1.3: The Barkhausen Effect
Description: A strong magnet is held up to a piece of steel in a coil of wire that's attached to a sound system. The magnet polarizes the steel and the changing domain structure of the steel is audible through the sound system.
Purpose: To show that the steel's magnetic polarization is the result of many sudden changes in its magnetic domains.
Supplies:
1 strong magnet
1 steel bar or rod
1 coil of wire attached to an electronic sound system
Procedure: Place the steel bar inside the coil of wire. Now approach the steel with the strong magnet. If the sound system is sensitive enough and the volume is high enough, you'll hear a hissing sound as the domains in the steel change size, shape, and magnetization in response to the approaching magnetic pole. Reverse the magnet and repeat the approach. Each time you remagnetize the steel differently, you'll hear the domains flipping and changing--the Barkhausen effect.
Explanation: The magnet polarizes on the steel by altering its domains. The alterations are sudden enough that they produce electric fields that affect the coil of wire and propel currents through the sound system. The hissing that you hear is the result of countless domain transitions..
Demonstration 11.1.4: Visualizing a Magnetic Field
Description: A small bar magnet is inserted into a magnetic field visualizer and the magnetic flux lines become visible.
Purpose: To show how the magnetic field extends from a magnet's north pole outward and around to the magnet's south pole.
Supplies:
1 magnetic field visualizer (a clear plastic rectangle, filled with iron powder and oil, with a hollow region into which you can put a small bar magnet)
1 bar magnet
Procedure: Shake the visualizer to disperse the iron powder evenly. Insert the bar magnet into the visualizer and watch as the iron powder accumulates along the magnetic flux lines. Point out that these lines indicate the direction of the force that an isolated north pole would experience if it were at one of those locations. (The fact that isolated north poles aren't available doesn't alter the meaning of the magnetic field lines.)
Explanation: The iron powder particles are magnetized by the magnetic field and line up along the flux lines because they respond to the magnetic forces associated with those flux lines.
Demonstration 11.1.5: Hanging from an Electromagnet
Description: A strong electromagnet hangs for the ceiling. A steel surface is touched to it and it's turned on. The forces between the electromagnet and the steel are so strong that you can hang from the steel without pulling it away from the electromagnet.
Purpose: To demonstrate the tremendous forces that are possible with electromagnets.
Supplies:
1 strong, battery-powered electromagnet (available from scientific supply companies)
1 thick steel plate, the same diameter as the electromagnet
2 strong steel eyelets with threaded shafts
2 ropes
Procedure: Use a drill and tap to attach one of the eyelets to the back of the electromagnet and the other to the back of the steel plate. Attach the ropes to the eyelets and hang the electromagnet from the ceiling. Form a loop in the rope attached to the steel plate so that you can hold onto the rope tightly. Now touch the steel plate to the electromagnet and turn the electromagnet on. The plate will bind very strongly to the electromagnet. Pull downward on the steel plate to show that it can't be pulled away easily. Try hanging on the plate (though be prepared for it to pull away from the electromagnet). If the electromagnet is sufficiently strong, the plate will remain attached.
Explanation: Steel is a ferromagnetic metal, meaning that it contains magnetically ordered domains. When you bring the steel near the electromagnet, the steel's domains change size and reorient to give the steel its own magnetic poles. The steel's poles are opposite to those of the electromagnet and the two bind together strongly.
Section 11.2 Electric Power Distribution
Demonstration 11.2.1: Distributing DC Power - Current Trouble
Description: A light bulb glows brightly when it's connected to a nearby battery but becomes much dimmer when the wires connecting it the battery grow longer. The solution to this problem is to use thicker wires.
Purpose: To show that wires are active components in a circuit and that thin wires carrying large currents waste lots of power.
Supplies:
1 12 V car battery
2 12 V lamps (about 80 W)
2 holders for the 12 V lamps
2 short wires (relatively thick gauge)
2 long, thin wires (at least 10 m long; we use 18 gauge speaker wire)
2 long, thick wires (same length as above; we use #10 gauge house wiring)
Procedure: Connect the car battery to the lamp using the short wires and observe that the lamp glows brightly. Discuss the fact that almost all the energy given to the current by the battery is deposited in the lamp's filament. The wires do waste some of the current's energy, but not enough to notice.
Now connect the second lamp to the same car battery with the long thin wires. This second lamp should be placed as far away as the wires will allow. It will also begin to glow, but not very brightly. Point out that while both lamps are identical, the long, thin wires are now wasting so much of the power they’re carrying that there isn't much left for the distant lamp.
After pointing out that the power a wire wastes is proportional to the square of the current it carries and inversely proportion to its electric resistance, replace the long, thin wires with the long, thick wires. The distant bulb will now glow much more brightly. Discuss how using thick wires reduces the fraction of power wasted in the wires. Because copper is expensive, this is an expensive solution to the problem of long distance electric power distribution.
Explanation: Reducing the electric resistance of the wires carrying electric power is part of the solution to electric power distribution. A much more effective solution is to reduce the current involved by raising the voltages involved.
Demonstration 11.2.2: Alternating Current Really Alternates
Description: A light emitting diode blinks red and green alternately when powered from an AC electric outlet.
Purpose: To show that the voltage (and therefore the current) provided by the AC power distribution system really does alternate.
Supplies:
1 Two-Color (Red and Green) LED (emits red light when current flows one direction, green the other direction)
1 low-voltage transformer (e.g., an outlet-mounted transformer with power wires)
1 current limiting resistor (for example, about 150 ohms for 5 volt AC).
Procedure: Connect the two wires from the low-voltage transformer to the LED, incorporating the current limiting resistor in series with the LED. Plug in the transformer and observe that the LED emits what appears to be orange light. Now wave the LED around rapidly in a darkened room and observe that the streaks of light are alternately red and green.
Explanation: The voltage difference between the two wires from the transformer reverse with the power line (i.e., 120 reversals per second in the US, 100 reversals per second in Europe). The LED therefore emits alternately red (when the current is propelled through it one direction) and green (when the current is propelled through it the other direction).
Demonstration 11.2.3: Jumping Rings
Description: A small aluminum ring is placed around a group of iron rods that pass through a coil of wire connected to the AC power line. When AC current flows through the wires, the ring is repelled by the coil of wire and leaps upward.
Purpose: To show that an electromagnet that's powered by alternating current repels nearby metal.
Supplies:
1 AC electromagnet with an iron-rod pole piece that extends vertically above the wire coil
1 solid aluminum ring that fits around the iron pole pieces
1 cut aluminum ring (cut so that it isn't a complete ring and can't conduct electricity in a full circle)
liquid nitrogen (optional)
Procedure: Place the aluminum ring around the pole piece and lower it onto the coil of wire. Now allow AC current to pass through the coil of wire. An AC current will begin flowing through the ring and the ring will become magnetic. The ring will experience a strong repulsion from the coil of wire and will leap up into the air.
Repeat this process with the cut aluminum ring. Because that ring can't conduct electricity, it won't become magnetic and won't be repelled by the wire coil.
Repeat this process with the complete aluminum ring, but chill it in liquid nitrogen first to increase its electrical conductivity. It will jump much higher.
Explanation: When AC current flows through the coil of wire, the electromagnet's poles reverse rapidly. The changing magnetic field induces an AC electric current in the aluminum ring and, in accordance with Lenz's law, the upward pointing pole of the coil is always the same as the downward pointing pole of the aluminum ring. The two objects repel.
Demonstration 11.2.4: Eddy Current Pendulum
Description: A metal pendulum swings freely through the pole pieces of an inactive electromagnet. But when the electromagnet is on, the pendulum slows to a stop as it tries to swing through the pole pieces of the electromagnet.
Purpose: To show that a conducting object that enters a magnetic field experiences a repulsive force that slows it down.
Supplies:
1 strong DC electromagnet
1 copper or aluminum pendulum with support (don’t use iron, steel, or any other ferromagnetic metal in the pendulum)
Procedure: With the DC electromagnet off, arrange the pendulum so that it swings smoothly between the electromagnet's pole pieces. Show that the inactive electromagnet has no effect on the pendulum. Now turn on the electromagnet and repeat the demonstration. The pendulum will slow dramatically as it enters the pole pieces and will probably come to a stop between them.
Explanation: As the pendulum approaches the pole pieces, the changing magnetic field it experiences induces currents in its surface. It becomes magnetic and, in accordance with Lenz's law, it repels the poles of the electromagnet. This repulsion slows its motion. The currents that gave rise to the magnetization in the pendulum quickly lose energy in the metal and the pendulum comes to rest between the pole pieces.
Follow-up: Repeat the experiment with another pendulum that can't conduct electricity (either a plastic pendulum or a metal pendulum with cuts through it that prevent currents from flowing). This modified pendulum will swing through the electromagnet even when that electromagnet is on.
Demonstration 11.2.5: A Magnet Falling Through A Copper Pipe
Description: A small magnet falls incredibly slowly through a copper pipe.
Purpose: To demonstrate the repulsive magnetic fields that appear when a magnet moves across a conductive surface.
Supplies:
1 small neodymium-iron-boron magnet
1 metal cylinder the same size as the magnet
1 narrow copper pipe
1 support for the copper pipe
Procedure: Support the copper pipe so that it's vertical. Drop the metal cylinder through the copper pipe and note how quickly it falls. Now drop the magnet through the pipe and watch how slowly it descends.
Explanation: As it falls, the magnet induces currents in the copper pipe and these currents exert repulsive magnetic forces on the magnet. These repulsive forces slow the magnet’s descent.
Demonstration 11.2.6: A Magnet Sliding Through a Half-Copper, Half-Plexiglas Track
Description: A small disk magnet rolls through a narrow track that's made of Plexiglas at one end and copper at the other. The magnet rolls quickly through the Plexiglas portion of the track but slows dramatically when it enters the copper portion of the track.
Purpose: To demonstrate the repulsive forces that occur when a magnet moves past a conducting surface.
Supplies:
1 small disk neodymium-iron-boron magnet
1 track for the magnet, cut from a square copper bar at one end and from a square Plexiglas bar at the other end. The two bars are joined and framed in Plexiglas to keep them together and to keep the magnet in the track.
Procedure: Tilt the track so that the magnetic disk rolls along the track. Show that the disk rolls quickly through the Plexiglas portion of the track but slows when it rolls through the copper portion of the track.
Explanation: The moving magnet induces currents in the conducting copper and experiences repulsive magnetic forces from the currents it induces. The magnet rolls freely through the Plexiglas because currents can't flow in the Plexiglas.
Demonstration 11.2.7: Superconductors and the Meissner Effect
Description: A small permanent magnet hovers above the surface of a high temperature superconductor.
Purpose: To demonstrate the perpetual current flow and magnetization of a superconductor when approached by a magnet.
Supplies:
1 high-Tc superconductor disk
1 small neodymium-iron-boron magnet
1 Styrofoam cup
1 thin foam rubber or sponge pad
liquid nitrogen
Procedure: Cut the Styrofoam cup to form a shallow tub and place the superconductor disk on the foam rubber pad in the middle of this tub. Fill this tub with liquid nitrogen and allow the disk to cool until the liquid nitrogen is barely boiling. Now lower the permanent magnet onto the disk and watch as it floats above the disk.
Explanation: The approaching magnet induces currents in the superconductor disk and the two repel one another. This repulsion suspends the magnet in midair. Because the currents in the superconductor don't decay away or lose energy, the suspension continues indefinitely.
Follow-up: Even if you leave the magnet on the superconducting disk while it's cooling down, the magnet will lift up off the surface of the superconductor as soon as the superconductor becomes cool enough to superconduct. This behavior, in which magnetic fields are excluded from a superconductor, is called the Meissner effect and is something not seen in normal conductors. It's unique to certain types of superconductors.
Demonstration 11.2.8: Alternating Current and Transformers
Description: An alternating current passes through an electromagnet. When a coil of wire with a light bulb attached to it is lowered over the pole piece of the electromagnet, the light bulb glows.
Purpose: To show that a transformer can transfer power from its primary circuit to its secondary circuit without any contact (or exchange of charge) between the two.
Supplies:
1 AC electromagnet with an iron-rod pole piece that extends vertically above the wire coil
1 coil of wire that forms a complete circuit with a small light bulb as part of that circuit
Procedure: Connect the AC electromagnet to the power line and turn it on. Point out that current is now flowing through the coil of the electromagnet, but that its direction of travel is reversing smoothly 120 times a second (or 100 times a second outside the United States). The electromagnet's magnetic poles are reversing directions with each reversal of the power line and these changes in the magnetic field near the electromagnet give rises to changing electric fields that circle the pole piece.
While there are no mobile electric charges near the pole piece, nothing happens. But now lower the coil of wire around the pole piece and watch the lamp begin to glow. Point out that the wire contains mobile electric charges that are pushed on by the electric fields around the pole piece. These electric fields do work on the mobile electric charges and the coil of wire becomes a source of electric power. This electric power is consumed by the light bulb. Note that there is no direct contact between the wire coil and the electromagnet—no charge or current moves between the primary coil and the secondary coil; only power is being transferred.
Explanation: The fluctuating magnetic field of the AC electromagnet creates a fluctuating electric field that circles the pole piece. When the coil of wire is lowered around that pole piece, the electric field pushes charges through the wire and does work on those charges. They experience a voltage rise as they flow around the coil (the more turns, the more voltage rise) and they deliver their energy to the light bulb. In the light bulb, these charges experience a voltage drop and they finally return to the coil to pick up more energy.
Demonstration 11.2.9: Step-Down Transformers
Description: A step-down transformer is used to heat a nail red hot.
Purpose: To show that a step-down transformer can take power that arrives as a modest current at a moderate voltage and use it to provide power to a second circuit as a large current at a small voltage.
Supplies:
1 power-line operated step-down transformer (a high current transformer—a soldering gun will work in a pinch)
2 nails
1 heavy gauge wires (as necessary)
Procedure: Connect one nail to each of the two secondary terminals of the step-down transformer. Touch the two nails together near their tip. Plug in the transformer and watch as the nails begin to glow red hot. If their temperatures become high enough, they will weld themselves together. Unplug the transformer and allow the nails to cool. If they have welded themselves together, show that this has happened.
Explanation: For the nails to consume enough electric power to reach red heat, they must have large currents flowing through them. The step-down transformer transfers power to a circuit that carries a large current of low energy (low voltage) charges and this large current is enough to heat the nails very hot.
Demonstration 11.2.10: Step-Up Transformers
Description: A step-up transformer is used to make a flaming arc that rises between two almost parallel vertical wires—a Jacob's ladder.
Purpose: To show that a step-up transformer can take power that arrives as a modest current at a moderate voltage and use it to provide power to a second circuit as a small current at a high voltage.
Supplies:
1 power-line operated step-up transformer (a high voltage transformer—a neon sign transformer works well)
2 copper rods or wires
Procedure: Connect one of the copper rods to each of the two secondary terminals of the step-up transformer. Bend the rods together so that they almost touch and then head vertically upward. Allow them to spread apart gradually as they rise upward. Be sure that the copper rods don't come near the case of the transformer or near anything else! When you're sure that everything (particularly people) is safely away from the transformer and the copper rods, plug in the transformer. A flaming arc will appear at the closest approach between the two rods and will then rise gradually upward until it breaks at the top of the rods. A new arc will appear at the bottom of the rods again and will begin to rise. If the arc fails to rise, you can help it start upward by blowing it upward, but be careful not to get near the transformer or rods.
Explanation: The step-up transformer is producing a small current of high energy (high voltage) charges. They have so much energy that they can leap through the air from one wire to the other, ionizing the air in the process. Once a path of ionized air forms, an arc, this arc becomes the natural path for subsequent charges to take between the copper rods. Because the arc consists of hot gases with low densities, it's lifted upward by the buoyant force until it breaks away from the top of the copper rods. A new arc then forms at the bottoms of the rods.
Demonstration 11.2.11: A Tesla Coil
Description: An air-core step-up transformer is used to produce long sparks.
Purpose: To show that a step-up transformer can take power that arrives as a modest current at a moderate voltage and use it to provide power to a second circuit as a very small current at a very high voltage.
Supplies:
1 telsa coil (commercial, or instructions on how to build one follow)
Constructing a Simple Tesla Coil: You'll need a neon sign transformer (about 12,000VAC output), one or more plate glass capacitors, a spark gap, and a cardboard or plastic pipe upon which to wind a very long coil of fine enamel-coated copper wire. You'll also need high voltage wire, rated to a voltage that's at least the voltage of the neon sign transformer.
To build the capacitor(s): glue aluminum foil to both sides of a large plate of heavy window glass (about 50 cm on a side). Leave at least 5 cm of open glass around the edges of the aluminum foil so that no arcs form around the edges.
To build the spark gap: mount two binding posts on an insulating support so that they're about 10 cm apart. Insert a sharpened copper rod into each binding post and bring the two tips to about 2 cm apart. You'll have to adjust this spacing to be sure that arcs form properly.
To build the main transformer: create the primary coil with 20 turns of high voltage wire. Support this wire on an insulating mount that gives it a diameter about 20 cm larger than that of the secondary coil. Now wind the secondary coil around the cardboard or plastic pipe. This pipe should be about 15 cm in diameter and about 1 to 1.5 m tall. Use 24 gauge enamel-coated copper wire to wind the secondary coil. You should be able to fit about 2,000 turns on the pipe, leaving about 5 cm at each end. The upper end of the secondary coil should be mounted so that it projects upward above the pipe. The pipe should sit vertically at the center of the primary coil. The primary coil should be at the base of the second coil.
Assembling the parts: unplug the neon sign transformer! The two secondary terminals of the neon sign transformer should be attached to the two sides of the capacitor. If you have more than one capacitor (the more capacitors—up to a maximum of 3—the higher the final voltage of the tesla coil), connect the capacitors in parallel. Keep all the wires well insulated and away from anything conducting, particularly other wires! Always use high voltage wire. Now connect one terminal of the spark gap to one secondary terminal of the neon sign transformer. Connect the other terminal of the spark gap to one side of the main primary coil. Connect the other side of the main primary coil to the other secondary terminal of the neon sign transformer. Ground the lower end of the main transformer secondary to a good earth ground.
To operate the Tesla coil: from a safe distance, plug in and turn on the neon sign transformer. If the spark gap doesn't begin to arc, immediately turn off the transformer and unplug it, then adjust the spark gap to have a narrower gap and try again. Once the spark gap fires, you should begin to see long sparks emerging from the top of the secondary coil. For the longest sparks, the spark gap should be adjusted (always unplug the neon sign transformer before adjusting it) so that it just barely fires during each half-cycle of the power line.
How it works: During each half cycle of the power line, the neon-sign transformer secondary moves charge from one side of the capacitor to the other until a large voltage difference appears across the capacitor. When this voltage difference becomes large enough to initiate a spark across the spark gap, it arcs and the capacitor becomes electrically connected to the primary coil of the main transformer. The capacitor and the primary coil then form a tank circuit, and charge sloshes back and forth from one surface of the capacitor to the other through the primary coil at radio frequencies (approximately 1 MHz). The changing magnetic field inside the primary coil induces current in the secondary coil of the main transformer. Because of its many turns, the voltage rise across the secondary coil of the transformer is enormous—between 100,000 V and 300,000 V, depending mostly on the number of capacitors in the circuit.
NOTICE: This Tesla coil uses dangerous voltages and should not be built or operated by anyone unfamiliar with safety precautions appropriate for the safe use of high voltages. The Tesla coil emits electromagnetic waves and may not comply with FCC regulations. It produces ozone gas, an irritating and toxic form of oxygen. Neither the author nor the publisher accepts any responsibility for health, regulatory, or other problems that arise from the construction and/or operation of this device.
Procedure: Turn on the Tesla coil and show that it produces a display of enormous sparks. Discuss the fact that because it has no iron core to store magnetic energy, it must operate at very high frequencies. The primary coil magnetizes empty space and the changing magnetization of empty space is enough to induce currents in the secondary coil. Note that the voltages involved in the Tesla coil are actually less than the voltages used in many high voltage transmission lines. Discuss the issues involved in keeping such high voltages from producing sparks and wasting power.
Explanation: A Tesla coil is an air core transformer that operates on very high frequency AC. The radio frequency current through the primary coil of the Tesla coil induces a radio frequency current in the secondary coil. Because there are far more turns in the secondary coil than in the primary coil, the Tesla coil acts as a step-up transformer and produces very high voltages.
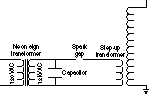
Demonstration 11.2.12: Distributing AC Power - Transformers Save the Day
Description: A light bulb glows brightly when it's connected to a nearby AC power source but becomes much dimmer when the wires connecting it to the power source are longer. While thicker wires help, there is a better solution: step the voltage up for transmission through the original wires and step the voltage down before delivering power to the light bulb. After inserting two transformers into the system, the distant light bulb glows brightly.
Purpose: To show that wires carrying a certain amount of power lose less of it when that power takes the form of a small current of high energy (high voltage) charges.
Supplies:
3 identical transformers: primary 120 VAC, secondary 12 V, 15 A or more. If possible, these transformers should be mounted on boards with terminals that allow easy connections. One of the transformers should have a power cord attached to its primary windings. In all cases, the transformers should be insulated properly and handled carefully to avoid shocks or fires. Note: if you choose not to operate two lamps at once, you don't need such large transformers. With only one lamp, you can get by with 7 A transformers (12 V times 7 A is 84 W).
2 12 V lamps (about 80 W)
2 holder for the 12 V lamp
2 short wires (relatively thick gauge)
2 long, thin wires (at least 10 m long; we use 18 gauge speaker wire)
2 long, thick wires (same length as above; we use #10 gauge house wiring)
Procedure: Begin with the transformer that has a power cord. Use the short wires to connect the secondary of this transformer to the lamp and plug in that transformer. Observe that the lamp glows brightly. The students shouldn't concern themselves with this first transformer—they should think of it as a source of 12 VAC power. Discuss the fact that this alternating current can cause the bulb to light, even though it's stopping and reversing many times a second. Discuss the fact that almost all the energy given to the current by the AC power source is deposited in the lamp's filament. While the wires waste some of the current's energy, it’s not enough to notice.
Now connect the second lamp to the same power source (the 12 VAC supply) with the long thin wires. This second lamp should be placed as far away as the wires will allow. It will also glow, but not very brightly. Point out that while both lamps are identical, the long, thin wires are now wasting so much of the power they’re carrying that there isn't much left for the distant lamp.
You can show, if you like, that replacing the long, thin wires with long, thick wires will solve the problem. However, you should then return to the thin wires. Now unplug the first transformer (for safety) and insert the two remaining transformers into the circuit. Place one transformer near the power source transformer and connect the secondary winding of this transformer to the secondary winding of the power source transformer. This added transformer will be the step-up transformer because it will convert a large current at 12 VAC into a small current at 120 VAC. Connect the two long, thin wires to the primary winding of this added transformer.
Now place the remaining transformer near the distant light bulb and attach the two long, thin wires to the primary winding of this transformer. Connect the secondary winding of this transformer to the distant light bulb. This third transformer will be the step-down transformer because it will convert a small current at 120 VAC into a large current at 12 VAC.
Starting with the 12 VAC from the power source transformer, there are 3 circuits: an initial 12 VAC circuit, a 120 VAC circuit that extends the length of the long, thin wires, and a final 12 VAC circuit. Now plug in the power source transformer and observe that both light bulbs, near and distant, glow equally brightly. The long, thin wires are now carrying a small current of high energy (high voltage) charges and are wasting relatively little power in the process. This demonstration shows how AC power permits the use of thin wires to carry electric power long distances with tolerable power loses.
Explanation: Even though the electric resistances of the long, thin wires is still high, they carry so little current that the power they consume (current squared times resistance) is still small.
Section 11.3 Electric Generators and Motors
Demonstration 11.3.1: Generating Electricity - A Coil and a Magnet
Description: When a magnet moves past a coil of wire, a current flows through the wire.
Purpose: To show that changing or moving magnetic fields can induce currents in electric conductors.
Supplies:
1 coil of wire
1 bar magnet
1 current meter (one that reads both positive and negative currents)
Procedure: Connect the two ends of the coil of wire to the two terminals of the current meter. Now move one pole of the bar magnet past the coil. You'll observe that the meter needle moves first one way and then the other. Show that as the pole approaches the coil, the needle moves one way and as the pole moves away from the coil, the needle moves the other way. Try reversing the magnet (use its other pole)—the effect will reverse.
Explanation: The changing magnetic field through the coil produces an electric field around it and this electric field pushes charges through the coil's windings. The meter registers this flowing current. The direction of current flow is determined by the direction in which the electric field points and that direction depends on how the magnetic field is changing.
Demonstration 11.3.2: Generating Electricity - A Coil and a Two-Color LED
Description: When a magnet moves past a large coil of wire, a current flows through it and illuminates an LED. The LED's color depends on which way the magnet moves and on which of its poles is being used.
Purpose: To show that moving a magnet past a conductor can cause a current to flow through that conductor.
Supplies:
1 large coil of wire (several hundred or even a thousand turns)
1 two-color LED (actually two different LEDs connected in parallel in the same package. One LED glows when the current flows one direction and the other LED glows when the current flows in the opposite direction. Alternatively, use two LEDs connected in parallel but in the opposite directions)
1 strong bar magnet
Procedure: Connect the LED to the two ends of the wire coil. Now hold the bar magnet in your hand and bring one of its poles toward the wire coil. The faster you move the magnet, the more effective it will be. The LED should light with one of its colors. Now pull the magnet out of the coil quickly. The LED should light with its other color. Repeat this process rapidly several times and point out that you are generating alternating current. If you were to attach the magnet to a spinning rotor, the LED would blink back and forth rapidly as the magnet swept by. Show that reversing the pole of the magnet reverses its effects.
Explanation: The changing magnetic field in the coil of wire induces currents in the coil. The coil is large enough (has enough turns) that these induced currents reach the high voltages (about 3 to 5 V) needed to power an LED.
Demonstration 11.3.3: An AC Generator
Description: You turn the crank of an AC generator and illuminate a light bulb. You show that it's much harder to turn the crank of the generator when current is flowing through the light bulb than when the circuit to the light bulb is open.
Purpose: To show how an AC generator works.
Supplies:
1 AC generator
1 suitable light bulb for the generator
1 light bulb holder
2 wires
Procedure: Connect the two terminals of the generator to the two terminals of the light bulb holder and light bulb. Turn the generator and show that the light bulb lights up. Allow a student to turn the generator and open and close the circuit to show that it's much harder to turn the generator while current is flowing and the generator is producing electric power.
Explanation: The generator moves a magnet past a coil (or a coil past a magnet) and generates an alternating electric current in the coil and the circuit to which that coil is attached. In this case, the current flows back and forth through the light bulb and its filament becomes hot.
Demonstration 11.3.4: A DC Motor
Description: A DC motor with a visible commutator turns rapidly as current passes through it from a battery.
Purpose: To show how a DC motor works.
Supplies:
1 DC motor demonstration, with a visible commutator
1 battery
2 wires
Procedure: Use the two wires to connect the DC motor to the battery. The motor will begin spinning. Reverse the battery and show that the motor turns the other way. Point out that the motor reverses because all the poles of the coil reverse but the permanent magnets that surround the coil remain unchanged. As a result, the torques on the rotor reverse and the motor spins backward. Stop the motor and discuss how the commutator reverses the flow of current through the coil just before the coil reaches its equilibrium orientation. This current reversal ensures that the coil keeps turning because the coil can never actually reach its equilibrium orientation.
Explanation: The battery provides power to the current that then flows through the coil of the motor. This current magnetizes the coil and causes the coil to experience a torque in the presence of the surrounding permanent magnets. The coil rotates so as to approach its equilibrium orientation within the permanent magnets, but before it arrives, the commutator causes the current through the coil to reverse and it must turn further. The coil never reaches an equilibrium orientation and continues to turn indefinitely.
Demonstration 11.3.5: A Very Simple DC Motor
Description: A tiny motor built right on top of a battery turns for hours without stopping.
Purpose: To illustrate just how easy it is to build an electric motor.
Supplies:
1 "D" battery
1 strong rubber band
2 large paper clips
1 square magnet, about 2 cm on a side and about 0.3 cm thick, with a north pole on one side and a south pole on the other.
enamel-coated copper wire, about #24 gauge
fine sandpaper
pliers
tape
1 small base
Procedure: One end of a paper clip has two metal loops. Locate this end of each clip and bend the outer loop over the inner loop so that you form an oval opening at that end of the paper clip. Place one of the modified paper clips at each end of the battery so that the two oval openings project outward from the same side of the battery. Hold the two paper clips in place with the rubber band. Lie the battery on its side so that the paper clips point directly upward and tape the battery to the base so that the battery won't roll. Use tape to attach the square magnet to the top of the battery, between the two paper clips.
Now wind a circular coil from the enamel-coated copper wire. You should form a coil about 2 cm in diameter that contains about 10 turns of wire. One end of the wire in the coil should extend about 3 cm to the left from the coil and the other end should extend about 3 cm to the right. Wrap the wire ends once or twice around the other 10 turns of wire before extending them outward, to help hold the coil together. You should end up with a wire ring that has an end wire extending leftward at 9 O'clock and another end wire extending rightward at 3 O'clock.
Sand away the insulation from one end wire but be careful with the other end wire. Hold the coil of wire so that the coil is in a vertical plane with the untouched end wire oriented horizontally. Lower that end wire onto a firm horizontal surface and sand away only the enamel that's on the upper half of the end wire. Leave the lower half enamel-coated.
Carefully insert the coil's end wires into the two oval loops of the two paper clips—one end wire into each oval—and let the end wires touch the paper clips. If the paper clips are touching the battery terminals and if the end wires of the wire coil are making contact with the paper clips, the coil should begin to move. You may have to spin the coil to get it started. Note that it will only spin properly in one direction, determined by the direction of current flow through the coil and the orientation of the magnet. The coil will spin as long as the electric connections are good and will operate for hours before depleting the battery's energy.
Explanation: Because of the partial insulation on the enamel wire, the coil is an electromagnet only for half its orientations. It is attracted or repelled by the magnet beneath it during half its rotation, but just as it gets to its equilibrium orientation, the current flow vanishes and it continues on for half a turn because of its rotational inertia. It continues to turn indefinitely.
Demonstration 11.3.6: Sophisticated DC Motors
Description: A DC motor that's attached to a variable-current power supply turns more rapidly as the current passing through it is increased. When the current passing through it is reversed, its direction of rotation reverses.
Purpose: To show that a DC motor's rotational speed increases as the voltage applied to it increases. Reversing the voltage drop across the motor also reverses its rotation.
Supplies:
1 good quality DC motor
1 variable-current DC power supply
2 wires
Procedure: Use the two wires to connect the power supply to the motor. Show that as the voltage applied to the motor increases, so does its rotational speed. Show also that when you reverse the voltage drop applied to the motor, that its direction of rotation reverses.
Explanation: The rotational speed of the motor is determined primarily by the voltage applied to it. The motor's rotation rate tends to be proportional to the voltage applied because the motor's speed deterines its back emf -- the magnetically induced voltage drop in the motor's coil. If the motor's coil didn't have any electrical resistance, the only way it could change the voltage of the charges passing through that coil would by by using its magnetic induction to remove energy and voltage fro those charges. That back emf is proportional to the rate of rotation, so the motor's rotation rate is proportional to the voltage you apply to it.
Demonstration 11.3.7: Two DC motors Connected in Parallel
Description: Two DC motors (with permanent magnets) are connected to one another by wires. When you turn one of the motors, the other motor also turns. Reversing the direction in which you turn the first motor reverses the direction in which the other motor turns.
Purpose: To show how a DC generator works.
Supplies:
2 DC motors (good bearings and permanent magnets are essential—we use two 12 V motors that are large and powerful; probably about 1/10 hp or so)
2 wires
Procedure: Connect the two DC motors together with the two wires so that you form one large circuit. Now spin the rotor of one of the motors and observe that the other motor spins. That's because you're generating electricity with the first motor (effectively a generator) and that electricity is powering the second motor. Do the same with the second motor and show that the two motors are interchangeable. Now show that reversing the direction in which you spin the first motor causes the second motor to reverse its direction of rotation. That's because the motors are acting as DC generators—they contain switching systems that ensure that the current flows in one direction that's determined only by the direction in which you spin the rotor. Similarly, the direction of current flow through a DC motor determines its direction of rotation.
Explanation: When you spin the rotor of the DC motor, you are moving a permanent magnet past a coil (or vice versa) and generating a current in that coil. A switching system inside the motor/generator changes the connections regularly so that current always flows in the same direction through the external portions of the circuit (as long as you don't reverse the direction in which the motor/generator's rotor is spinning). The DC electricity that you generate with the first motor/generator powers the second motor/generator, which turns in a direction determined by the direction of current flow through the circuit.
Demonstration 11.3.8: A Galvanometer
Description: When you send current through the coil of a galvanometer, the coil moves. Since there is a magnetic field passing through the coil, the Lorentz force causes it to experience a torque.
Purpose: To show that a current carrying coil in a magnetic field can experience a torque due to the Lorentz force.
Supplies:
1 galvanometer (or a coil of wire that's supported in a low-friction bearing and surrounded by permanent magnets)
1 battery
2 wires
1 resistor (to limit the current through the galvanometer, if necessary)
Procedure: Use the two wires to connect the battery to the galvanometer. If the galvanometer involves thin wires, you should include a current-limiting resistor in the circuit. As soon as you complete the circuit and current begins to flow through the galvanometer, its coil will experience the Lorentz force as a torque and it will pivot against a spring and then settle down. Unlike a motor, the galvanometer coil has an equilibrium orientation into which it's able to settle.
Explanation: The galvanometer coil will turn because the current it carries experiences the Lorentz force in the presence of the magnetic field.
Demonstration 11.3.9: A Simple Induction Motor
Description: An aluminum pizza platter or pie dish floats on water. When you move a strong magnet around in a circle above the platter, the platter begins to rotate with the magnet, even though the two aren't touching.
Purpose: To show how the current induced by a moving magnet experiences the Lorentz force and gets pulled along with the magnet.
Supplies:
1 aluminum pizza platter or pie dish
1 large, shallow container of water (large enough to float the aluminum dish in)
1 strong magnet
Procedure: Float the platter or dish in the water and stop it from turning. Now hold one pole of the magnet a few centimeters above the platter and begin to circle the outer edge of the platter with the magnet. The platter will experience angular acceleration and will begin to turn with the circling magnet.
Explanation: The moving magnet induces currents in the platter and those currents experience the Lorentz force in the presence of the magnetic field. The currents are pushed along with the magnet and, if you could continue this motion steadily enough, the platter would end up turning just a little more slowly than the magnet.
Demonstration 11.3.10: A Large Single-Phase Induction Motor
Description: A capacitor-start motor leaps into action when you turn it on and rotates steadily there after.
Purpose: To demonstrate the operation of a powerful induction motor.
Supplies:
1 large induction motor with a starting capacitor (1/2 hp or whatever you can find)
Procedure: Hold the induction motor in place (I use my foot) and plug it in. It will jump as its rotor begins to spin. Point out the raised ridge on its side. This ridge contains a capacitor that helps to create a magnetic pole in the stator that circles the rotor in a particular direction as the motor starts up. During its operation, the rotor turns almost as fast as the circling pole of the stator. Since the rate at which the stator's pole circles the rotor depends on the cycling of the power line, the motor's rotational speed is determined by the power line frequency. Many induction motors complete one full turn for every two cycles of the power line. These motors turn at almost 1800 rpm (almost 30 turns per second) in the United States or almost 1500 rpm in many other countries.
Explanation: The stator of the induction motor is built from electromagnets. The starting capacitor provides a delayed phase to some of the electromagnets during the starting process so that the magnetic poles of the stator circle the rotor in a particular direction. (Note for the experts: Once the rotor is turning properly, the delayed phase isn't needed any more. The poles of the stator are then driven directly from the single phase power and these poles oscillate back and forth rather than circling the rotor. However, these oscillating poles can be decomposed into pair of poles that circle with and against the direction in which the rotor is spinning. It turns out that the torque exerted on the rotor by the poles that are circling with the rotor are strongest and they keep the rotor turning steadily and powerfully forward.)
Demonstration 11.3.11: An Electric Fan
Description: The induction motor of an electric fan turns at 2 or 3 different speeds, as determined by the rotation rates of the poles on its stator.
Purpose: To show how varying the rotation speeds of the stator poles can change the rotation speed of an induction motor's rotor.
Supplies:
1 2- or 3-speed fan
Procedure: Show that the fan has two or three different speeds of rotation. These speeds are determined by how rapidly the poles of the stator circle the rotor.
Explanation: The faster the poles of the stator circle the rotor, the faster the rotor must turn to keep up with the circling poles.
Demonstration 11.3.12: A Shaded Pole Motor
Description: A copper disk that can turn on a bearing is held horizontally above the pole piece of an AC electromagnet. When the electromagnet is operating and another piece of copper shades half the pole piece from the copper disk, the disk begins to turn.
Purpose: To demonstrate another type of induction motor—a shaded pole motor.
Supplies:
1 copper disk, about 10 cm in diameter that turns about a central bearing
1 support for the copper disk and its bearing
1 AC electromagnet with a vertical pole piece that extends upward above the electromagnet
1 thick piece of highly conductive copper sheet (about 3 or 4 mm thick)
Procedure: Mount the copper disk horizontally above the pole piece of the AC electromagnet. The pole piece should end about 1 cm below one edge of the disk. Turn on the AC electromagnet and gradually slide the copper sheet on top of the pole piece until it covers half the pole piece. The edge of the strip should be aligned with the radius of the disk. The disk will begin turning so that its surface moves from above the uncovered portion of the pole piece to above the covered portion. If you shift the copper sheet to the other side of the pole piece, the disk will begin to turn the other way.
Explanation: The presence of the copper sheet above the pole piece delays the formation of a magnetic pole on the copper-shaded side of the pole piece. This delay occurs because the induced currents in the copper sheet temporarily shield the area above the sheet from the magnetic field of the pole piece. In effect, the pole moves from the unshaded portion of the pole piece to the shaded portion. The copper disk moves with this moving pole and it turns.
Follow-up: You can replace the disk and bearing with a copper ball that floats in water. The ball will begin to rotate when you cover half the pole piece with copper.